Tuesday, December 31, 2013

Nails of the Week


First off, I'm sorry I didn't post this yesterday(Monday). The days got away from me and I forgot. :'( But better late than never! 

I used "teal blue" by Forever21 and my ring finger has the 3D Manicure beads that I got from my friend for Christmas. It is pretty cool. :) I believe she got it from Kohl's if you want to try and find it.

I hope everyone had a great holiday and a happy New Year!

Monday, December 23, 2013

Christmas Nails

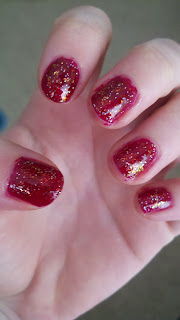
As promised, here is my Christmas nails post! But unfortunately, this was not how I was intending to do my nails. I was planning on doing a candy cane pattern on my ring finger... but it went hopelessly wrong. So I decided to do red with glitter. Kinda boring, I know but I already took my nail polish off once and I didn't want to do it again. :-/

I used Essie "skirting the issue"(of course), a random silver glitter, and Essie "shine of the times" for the chunky glitter.

I hope everyone has a wonderful Christmas!! 

I know personally that this time of the year can be difficult for some people, but I hope we can all make it a fun and enjoyable time! 

Be safe & Merry Christmas!

Saturday, December 21, 2013

DIY Holiday Banner


Sorry this post is a day late... but better late than never! 


Supplies: Christmas Paper
White Paper
Embroidery Thread
Push Pin
Needle
Scissors
Glue stick (not pictured)

1. Cut out triangles that are all the same size.

2. Write out your word on white paper and cut them out.

3. Use a glue stick to glue the letters to the triangles.

4. Use the push pin to make holes in the top corners of the triangle. 

5. Thread the needle and thread the triangles together.


 Hang on your stairs, over your window, maybe even on your tree!


Keep a look out Monday for my holiday nails post!

Happy December!

S


Monday, December 16, 2013

DIY Snow globe

Supplies: Mason Jar
Hot glue gun and glue
Glitter
Figurine of choice


1. Use the hot glue gun to glue your figurine to the inside of the lid.


2. Add glitter to the jar.

3. Fill the jar with water (not all the way to the top) Put the lid on and squeeze tight and your done!

Here is another craft option:

 Glitter Mason Jar candle holder

I did something similar to this back in October. You can use Christmas colors instead of silver to make this specific to Christmas. Or it would be perfect all year round with whatever color you want! I will like the post here:


Happy December!

S

Friday, December 13, 2013

Nails of the Week


My nails aren't really holiday inspired, but I recently got these nail polishes and I was excited to use them. I don't know if anyone has noticed, but teal is my favorite color. I have loved this color for years and I can't really explain why.

I used Spoiled in the color "Distant Memory" for the base color and Milani in "Teal" for the sparkle color. It always disappoints me when you see sparkly nail polishes and get all excited because they are so pretty but when you use them they are really thin and not many sparkles come out on the brush... I wish it could be as sparkly as it is in the bottle. But I am still pleased with my nails and of course love the teal color. :]

But in the next couple weeks, I plan to have Christmas nails and I am pretty excited. So keep a look out for that post! And hopefully on Monday, I will have another holiday craft post!!


Happy December!!


S

Monday, December 9, 2013

OOTD


Sweater: Doe & Rae from Marshall's
Jeans: Thrift store (normally from Target)
Shoes: Target
Scarf: Made myself


If you like my scarf, check out my etsy page. 

Friday, December 6, 2013

Nails of the Week


I got this idea from a picture I saw on Pinterest. I used blue painters tape to make the shape and the polish I used was Essie "skirting the issue". It is one of my favorite nail polishes. And it isn't purple! I promised my next nail post would not be a purple nail polish. :]

Hope your having a great December!

S

Monday, December 2, 2013

DIY Felt Heart Ornament


Supplies: Felt
Needle
Thread
Ribbon
Scissors

1.Line up two sheets of felt. Draw or trace a heart on your felt.

2. Cut your heart out of both pieces of felt. You should now have two hearts the same size.

3. Line up your hearts and begin sewing the edge.

4. Repeat until you have gone all the way around your heart.

5. Sew on your ribbon (but I recommend doing this before you sew your two heart together, it will be easier)

6. And your done! 

Get creative!
 Make different shapes and use different sewing stitches.

Happy December!

Saturday, November 30, 2013

New schedule

Hi Everyone!


I just wanted to let you know that I will be changing my post schedule. I was trying to do every other day. But I think I am going to do Monday and Fridays for postings. Things have been crazy lately and with the holidays coming up, it is getting difficult. But keep a look out for holiday crafts leading up to Christmas!!

Hope everyone had a great Thanksgiving!

S

Tuesday, November 26, 2013

Nails of the Week


N.Y.C Nail Glossies in #239


Not really a Thanksgiving color, but I just love purple. It is one of my favorite colors. And I usually pick the color I am going to use based off of what I feel at the time. But I have realized that this is the second week in a row that I have picked purple for my nails. Opps....
I promise I will have something other than purple painted on my nails next week!!


Happy Thanksgiving!
Gobble! Gobble!

Saturday, November 23, 2013

Giving Thanks Jar


Perfect idea for Thanksgiving!

Have everyone write what they are thankful for and place it in the jar. Once you have eaten your yummy food, have someone read all the pieces of paper aloud.

Or if you want to give this to someone as a gift for the holidays, you can write funny memories or why you appreciate them. It is an inexpensive gift but perfect to tell someone you care.

I got the jar from JoAnn's for a dollar and the ribbon for very cheap as well. I also added a crochet heart on top just because I thought it would be cute.


More Thanksgiving and Christmas crafts to come!!

Wednesday, November 20, 2013

DIY Bleached Jeans

Sorry I don't have pictures with the step-by-step like I normally do, but I bleached these jeans a few years ago. But I will still write out the steps to achieve this look.


Supplies: Old pair of jeans
Bleach
Gloves


1. Buy a cheap pair of jeans or use an old pair your don't mind bleaching.
2. Lay the jeans over the sink.
3. Put gloves on and pour a small amount of bleach into your hand.
4. Start to splatter or pour bleach onto your jeans however you like.
5. Do this pretty quickly so the bleach doesn't start to destroy the fabric.
6. Once done, fill the sink up with water and drench the jeans in the water. Move/scrunch the jeans up to stop the bleaching process.
6. Wash the jeans in the washing machine and dry them.
Enjoy!


*Please be careful using bleach. It can be harmful to your skin and other clothing.*


Saturday, November 16, 2013

Nails of the Week

Nail polish: Forever21
Nail Stickers: Daiso Store

This is probably one of my favorite nail polishes. Purple is one of my favorite colors and this dark color is so pretty and perfect for fall.
 I don't think that Forever 21 still sells it, but I'm sure you can find a very similar color somewhere else.

Happy Fall!

Wednesday, November 13, 2013

New Etsy Items!


Just added some new items to my etsy store! I would love it if you checked it out! Perfect gifts for the holidays!

www.etsy.com/shop/smantey

Picture Frame Collage

Supplies:
 -Picture frame
-Ribbon or Twine
-Stapler or Glue gun
-Paper clips or clothes pins
-Pictures

1. Turn the frame over and layout ribbon in place.

2. Use the stapler or glue gun to secure ribbon.


3. Repeat on other end. Make sure the ribbon is pulled tight.


4. Repeat

5. Use paper clips or clothes pins to secure photos.


Hang on the wall and your done!

Friday, November 8, 2013

OOTD


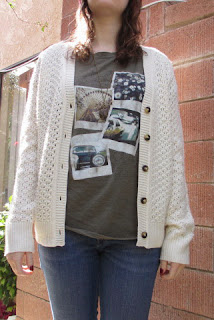
Top: Target
Cardigan: Forever21
Jeans: Rich & Skinny from Marshall's
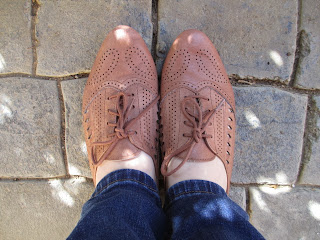
Shoes: Urban Outfitters

Monday, November 4, 2013

Nails of the Week


I love this color for fall. I can't really explain it, but I just think it gorgeous. I now have a beanie, sweater and a pair of jeans that are this color. I'm going a little burgundy crazy. :]

The color I used is from Ulta Beauty, but doesn't have a name. But something very similar is Essie "Skirting the issue".

Friday, November 1, 2013

OOTD

Beanie: Target
T-shirt: TJMaxx
Cardigan: Forever21
Jeans: Levi's
Clock Necklace: Claire's


Cat Flats: DailyLook $29.99 Smiling Cat Flats